Application for Web-IO
MQTT Web Client with JavaScript
as individual interface for Web-IO
In this tutorial the JavaScript MQTT client from the Eclipse-Paho Project will be used to create an individual interface for the Web-IO 4.0 Digital.
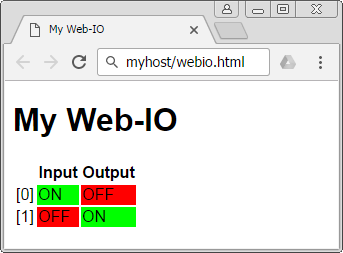
Here the states of the Web-IO are buffer stored as a retained message with the broker and represented by the Web client in a simple HTML table.
When one of the outputs is clicked on, the Web client sends an MQTT Publish which instructs the Web-IO to switch the corresponding output.
Structure of the client
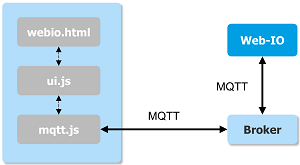
The Web client provides a user interface for a remote Web-IO. Communication between the Web-IO and Web client is via the IoT protocol MQTT.
The client consists of the three files:
- webio.html
- ui.js
- mqtt.js
Communication between Web Client and Web-IO
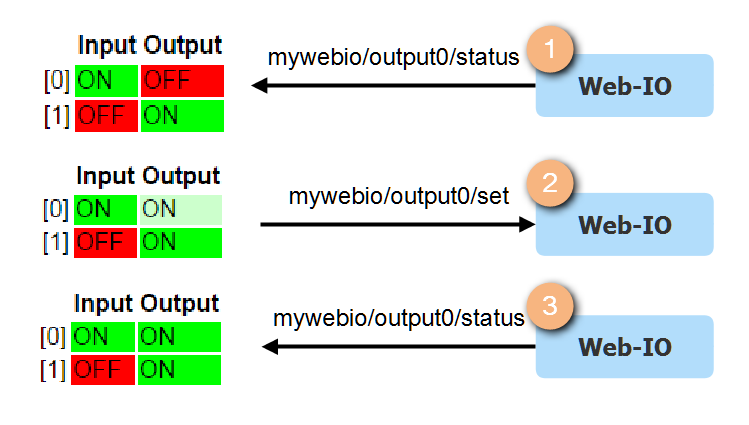
The adjacent representation of communication between Web-IO and Web Client the broker is not shown for the sake of simplicity.
Communication takes place via the topics mywebio/<io>/status, by which the Web-IO publishes the current switching state, and mywebio/<io>/set, by which the Web interface sends a switching request to the Web-IO.
1 After the Web Client has connected, it receives the states of the individual in- and outputs as retained messages and represents them in an HTML table.
2 As soon as the user clicks on an output (here Output 0), the Web Client issues a Publish with the payload "ON" and the topic "mywebio/output0/set". The unconfirmed request is shown in the Web Client by a paler color.
3 The Web-IO responds to the receipt of the subscription by turning on the corresponding output. Then it sends a Publish with the new state as payload and the topic "mywebio/output0/status". As soon as the Web Client has received the message it shows the output in full color intensity.
Note: If there are multiple successive change requests without a confirmation from the Web-IO, the corresponding output is grayed out and not activated again until the Web-IO has published its present status.
Preparation: Configuration of the broker and the Web-IO
Specify users and access rights
For this tutorial, as in the tutorial Box-2-Box via MQTT, the free broker cloudmqtt.com for small applications is used.
For the sake of simplicity only a single user will be created with broad rights:
| User name | Password | Write authorization | Read authorization |
|---|---|---|---|
| webio | Super$afe123 | # | # |
Basic settings for MQTT
The Web-IO is configured for interchange with the broker on the page "Communication paths >> MQTT".

1 First activate MQTT.
2 Enter the user name and password.
3 Enter the connection information for the broker.
Create actions for switching the outputs.
Now open the page "Actions" and click on "Add" to create the actions for receiving a subscription.

1 Activate the action and give it a logical name.
2 The trigger is receipt of a MQTT subscription with the topic path mywebio/output0/set and the topic text ON.
3 When the trigger occurs, the Web-IO should switch an output, in this case Output 0 to "ON".
Repeat the last step until you have defined a total of four actions: Output 0 to ON, Output 0 to OFF, Output 1 to ON and Output 1 to OFF.
Create actions for publishing IO states
In the last configuration step the actions are created with issue an MQTT publish when there is a status change on any in- or output.

1 Set the action to active and assign it a logical name.
2 Select as a trigger Input and then select a change to OFF for Input0.
3 As the action an MQTT publish should be executed.
4 The Topic for publishing a new status is "mywebio/input0/status".
5 The payload (Topic Text) for a change to OFF is "OFF".
6 The Topic Clear Text is the message which is sent when the trigger is no longer present, i.e. "ON".
Repeat setting up the action for the other input and for both outputs.
Implementing the Web Client
In the following the three files webio.html, mqtt.js and ui.js are covered in detail. The HTML file contains only the basic design elements, and so it will be covered only briefly. Following is a more detailed discussion of the two JavaScript files.
webio.html: The graphical representation
<!doctype html>
<html lang="de">
	<head>
		<script type="text/javascript" src="https://cdnjs.cloudflare.com/ajax/libs/paho-mqtt/1.0.1/mqttws31.min.js"></script>
		<script src="webio_mqtt.js" type="text/javascript"></script>
		<script src="ui.js" type="text/javascript" defer></script>
		<meta charset="utf-8">
		<title>My Web-IO</title>
		<style type="text/css">
			body {font-family: sans-serif;}
			table {empty-cells: show;}
			.on {background-color: #00FF00;}
			.off {background-color: #FF0000;}
			.set_on {background-color: #CCFFCC;}
			.set_off {background-color: #FFCCCC;}
			.unknown {background-color: #DDDDDD;}
			.on:before, .set_on:before {content: "ON";}
			.off:before, .set_off:before {content: "OFF";}
			.unknown:before	{content: "?";}
			#output0,#output1{cursor: pointer;}
		</style>
	</head>

	<body>
		<h1>My Web-IO</h1>
		<table>
		<tr>
			<th></th>
			<th>Input</th>
			<th>Output</th>
		</tr>
		<tr>
			<td >[0]</td>
			<td class="unknown" id="input0"></td>
			<td class="unknown" id="output0"></td>
		</tr>
		<tr>
			<td >[1]</td>
			<td class="unknown" id="input1"></td>
			<td class="unknown" id="output1"></td>
		</tr>
		</table>
	</body>
</html>- Lines 4-6:
Incorporating the PAHO-JavaScript Client. Alternate URL: https://cdnjs.cloudflare.com/ajax/libs/paho-mqtt/1.0.1/mqttws31.min.js - Line 7 and 8:
Incorporating the local JS files. The attribute defer ensures that the functions which access HTML elements are not carried out until the entire page has been loaded. - line 12-24:
Style information for the various states. In addition to assigning a color the element is preceded either by the text ON, OFF or ?. - Line 29-45:
The table which displays the in- and outputs. The individual in- and outputs are represented here by table cells to which a CSS class is assigned for display. The elements are identified by IDs which are named exactly the same as the in- and outputs of the Web-IO.
mqtt.js: The actual MQTT client
The file mqtt.js contains the functions for opening the connection to the MQTT broker and for receiving and sending messages.
/*
	* MQTT-WebClient example for Web-IO 4.0
*/
var hostname = "m21.cloudmqtt.com";
var port = 37719;
var clientId = "webio4mqttexample";
clientId += new Date().getUTCMilliseconds();;
var username = "webclient";
var password = "Super$icher123";
var subscription = "mywebio/+/status";

mqttClient = new Paho.MQTT.Client(hostname, port, clientId);
mqttClient.onMessageArrived = MessageArrived;
mqttClient.onConnectionLost = ConnectionLost;
Connect();

/*Initiates a connection to the MQTT broker*/
function Connect(){
	mqttClient.connect({
	onSuccess: Connected,
	onFailure: ConnectionFailed,
	keepAliveInterval: 10,
	userName: username,
	useSSL: true,
	password: password});
}

/*Callback for successful MQTT connection */
function Connected() {
	console.log("Connected");
	mqttClient.subscribe(subscription);
}

/*Callback for failed connection*/
function ConnectionFailed(res) {
	console.log("Connect failed:" + res.errorMessage);
}

/*Callback for lost connection*/
function ConnectionLost(res) {
	if (res.errorCode !== 0) {
		console.log("Connection lost:" + res.errorMessage);
		Connect();
	}
}

/*Callback for incoming message processing */
function MessageArrived(message) {
	console.log(message.destinationName +" : " + message.payloadString);
	switch(message.payloadString){
		case "ON":
			displayClass = "on";
			break;
		case "OFF":
			displayClass = "off";
			break;
		default:
			displayClass = "unknown";
	}
	var topic = message.destinationName.split("/");
	if (topic.length == 3){
		var ioname = topic[1];
		UpdateElement(ioname, displayClass);
	}
}
Configuration values and opening a connection
First a few configuration values are set:
var hostname 	= "m21.cloudmqtt.com";
var port 		= 37719;
var clientId	= "webio4mqttexample";
clientID += new Date().getUTCMilliseconds();
var username	= "webclient";
var password	= "Super$icher123";
var subscription = "mywebio/+/status";
- Lines 4 and 5:
The connection information for the MQTT broker - Line 6:
A unique string which identifies the accessing client. - Line 7:
The instructionnew Date().getUTCMilliseconds()ensures that multiple instances of the client are allowed to be open at the same time by adding a current time stamp to the Client ID. Multiple connections with the same Client ID would be closed by the broker according to the standard. - Lines 8 and 9:
The login data of the user - Line 10:
The topic by means of which the Web-IO publishes its states.
Next the client is initialized:
mqttClient = new Paho.MQTT.Client(hostname, port, clientId);
mqttClient.onMessageArrived = MessageArrived;
mqttClient.onConnectionLost = ConnectionLost;
Connect();- Line 12:
Initializing of the MQTT client with the host name of the broker, the port and the unique Client ID. - Line 13:
MessageArrived()is the callback function which is invoked when a subscription is received. - Line 14:
ConnectionLost()is invoked in case a connection is terminated. - Line 15:
Connect is used to open the connection.
The function Connect() is responsible for opening the connection to the MQTT broker. The configuration object contains the already specified parameters as well as the callback functions for a successful or failed connection.
/*Initiates a connection to the MQTT broker*/
function Connect(){
	mqttclient.connect({
		onSuccess:	Connected,
		onFailure:	ConnectionFailed,
		keepAliveInterval: 10,
		userName:	username,
		useSSL:		true,
		password:	password
	});
}- Line 19:
The connection invokes the methodconnect()of the MQTT client. - Line 20:
After successful opening of a connection the callback functionConnected()is carried out. - Line 21:
After a failed connection attemptConnectionFailed()is invoked. - Line 24:
Communication takes place encrypted via TLS.
The callback functions
In the first section four callback functions were mentioned: MessageArrived() and ConnectionLost() were set as MQTT client attributes, Connected() and ConnectionFailed() were passed to the function Connect() in the configuration object.
Connected() is carried out if the connection was successfully opened.
/*Callback for successful MQTT connection */
function Connected() {
	console.log("Connected");
	mqttclient.subscribe(subscription);
} - Line 31:
The connection status is output using the JavaScript console. - Line 32:
Since it is not a persistent connection, the topic must be resubscribed for messages from the Web-IO every time a connection is opened.
When opening of the connection has failed, ConnectionFailed() outputs information on the JavaScript console.
/*Callback for failed connection*/
function ConnectionFailed(res) {
		console.log("Connect failed:" + res.errorMessage);
}
In case a connection is terminated ConnectionLost() is invoked.
/*Callback for lost connection*/
function ConnectionLost(res) {
	if (res.errorCode !== 0)
	{
	console.log("Connection lost:" + res.errorMessage);
	Connect();
	}
}- Line 43:
Information about the terminated connection are output on the JavaScript console. - Line 44:
Then a new connection is opened.
The broadest function is MessageArrived(). The upper part of the function analyzes the payload string. It is used to determine the CSS class which is assigned to the corresponding element.
/*Callback for incoming message processing */
function MessageArrived(message) {
	switch(message.payloadString){
		case "ON":
			displayClass = "on";
			break;
		case "OFF":
			displayClass = "off";
			break;
		default:
			displayClass = "unknown";
}- Line 50:
The message object has an attributepayloadStringwhich contains the contents of the transmitted message. - Lines 51-56:
When the message contents is "ON", the variable displayClass is set to "on". If the payload is "OFF" it is set to "off". - Lines 57-58:
When there is a faulty payload the display class is set to "unknown".
The lower part of the function determines which in- or output should be refreshed:
var topic = message.destinationName.split("/");
	if (topic.length == 3){
		var ioname = topic[1];
		UpdateElement(ioname, displayClass);
	}
}- Line 61:
First themessage.destinationName, i.e. the topic of the message, is broken down using the string methodsplit()on the character "l" into its individual members and these are stored in thetopicarray. - Line 63:
For mywebio/ioname/status the middle element is the name of the corresponding in- or output. - Line 64:
The DOM elementionameis assignedUpdateElement()the CSS class in thedisplayClassfunction.
ui.js: The connection between the HTML page and MQTT client
The ui.js contains the functions which refresh representation of the HTML page and which invoke the MQTT client functions after a user interaction.
/*
	* Web-IO 4.0: MQTT WebSocket example
	*/

/* Updates the CSS class of an DOM element */
function UpdateElement(ioname, displayClass){
	var cell = document.getElementById(ioname);
	if (cell){
		cell.className = displayClass;
	}
	}

	/* Toggles an input in the web interfaces and
	* initiates an MQTT publish */
function ToggleOutput(ioname){
	var cell = document.getElementById(ioname);
	switch (cell.className){
	case "on":
		var message = new Paho.MQTT.Message("OFF");
		message.destinationName = "webio/" + ioname + "/set";
		mqttClient.send(message);
		cell.className = "set_off";
		break;
	case "off":
		var message = new Paho.MQTT.Message("ON");
		message.destinationName = "webio/" + ioname + "/set";
		mqttClient.send(message);
		cell.className = "set_on";
		break;
	default:
		cell.className = "unknown";
		break;
	}

};

/* Adds an Click-Event-Listener to a table cell, so that after
	* a click the element can is toggeled */
function EnableToggle(ioname){
		var cell = document.getElementById(ioname)
		if (cell){
			cell.addEventListener("click",
				function(){
				ToggleOutput(ioname)
			},
				true);
		}
	}

/*Initialize elements that can be toggled my by click*/
EnableToggle("output0");
EnableToggle("output1");
Refreshing the display using the MQTT client
Using the function UpdateElement() the MQTT client sets the CSS class for the corresponding table cell to the present status when a subscription is received.
/* Updates the CSS class of an DOM element */
function UpdateElement(ioname, displayClass){
	var cell = document.getElementById(ioname);
	if (cell){
		cell.className = displayClass;
	}
}- Line 6:
The function is given the ID of the DOM element and the CSS class. - Line 9:
This class is assigned to the element.
User interactions
The function ToggleOutput() adjusts its representation when an output is clicked on and sends a corresponding MQTT publish. If the current class is on, it is assigned the set_off class, if the class is off, it is assigned the new set_on class. In all other cases the current status of the output is unconfirmed and the display is assigned the class unknown function.
/* Toggles an input in the web interfaces and
	* initiates an MQTT publish
	*/
function ToggleOutput(ioname){
	var cell = document.getElementById(ioname);
	switch (cell.className){
	case "on":
		var message = new Paho.MQTT.Message("OFF");
		message.destinationName = "webio/" + ioname + "/set";
		mqttClient.send(message);
		cell.className = "set_off";
		break;
	case "off":
		var message = new Paho.MQTT.Message("ON");
		message.destinationName = "webio/" + ioname + "/set";
		mqttClient.send(message);
		cell.className = "set_on";
		break;
	default:
		cell.className = "unknown";
		break;
	}
};- Line 16:
The function is given the ID of the DOM element which represents the output. - Line 18:
Depending on the current class of the element is - Lines 19-24, 25-30 and 21-33:
the new class is setset_on,set_offorunknown.
So that the function ToggleOutput() can be invoked when clicking on a table cell, EnableToggle() adds an event handler for a mouse click to the transmitted elements.
/* Adds an Click-Event-Listener to a table cell, so that after
	* a click the element can is toggeled
	*/
function EnableToggle(ioname){
		var cell = document.getElementById(ioname)
		if (cell){
			cell.addEventListener("click",
				function(){
				ToggleOutput(ioname)
			},
				true);
		}
}- Line 40
The method is given the name of an IO. - Line 41:
This name is used to reference the corresponding table cell. - Line 43-47:
Using the methodaddEventListener()the element is assignedcellan event handler for aclick. When the corresponding element is clicked on, the functionToggleOutput()should be invoked with the name of the IO as a parameter.
Finally EnableToggle() is invoked for both elements "output1" and "output2":
/*Initialize elements that can be toggled my by click*/
EnableToggle("output0");
EnableToggle("output1");
Work through this tutorial with hardware
Would you like to work through this tutorial but don’t have the necessary hardware? We will be happy to provide you with a Web-IO Digital 4.0 as a sample.
More questions about the Web-IO Digital and MQTT?
Mr. Thiel will be glad to help.
Phone: +49 202/2680-110 (Mon.-Fri. 8 a.m. to 5 p.m.)
E-mail: f.thiel@wut.de