Tutorial:
Access a Web-IO from a smartphone using a VPN tunnel
Access from any location, secure connection, simple configuration: in this tutorial you will be guided step-by-step through the necessary configurations for accessing a Web-IO from a smartphone.

Prerequisites:
-
The Microwall and the Web-IO are fully placed in operation in the customer LAN of the Web-IO island at the above indicated address.
-
The Web-Based-Management of the Microwall can be reached in the customer’s company network.
-
The Wireguard app is installed on the Android smartphone (Find the app by searching for "wireguard" in the Google Play Store - also available in the App Store for Apple devices).
In the example shown here the Microwall is used to configure the VPN client for the sake of simplicity. Also included is the sensitive private key which authenticates the client. For environments with heightened security requirements the key should therefore be generated on the client itself and only the non-critical public key be passed to the Microwall.
Necessary steps at a glance:
1. VPN configuration of Microwall and smartphone
-
In the customer LAN start a browser, use https to open a connection to the Microwall and log in.
-
Navigate to "Home", to "VPN-Server" and to "VPN environment".
-
The "Virtual IP" of the VPN server and IP area of the VPN tunnel is for the most part selectable. As long as there is no conflict with the IP areas of the company network of the Web-IO island, the Microwall default can be used.

-
The VPN server expects incoming connections from the VPN client on the specified UDP port. For the port number used here address-/port forwarding to the IP address of the Microwall must be set up on the perimeter router.
-
Save the changes and navigate through "Home" and "VPN client" to "Client inventory".
-
To set up a new VPN client first click on the + symbol. For the simplified startup described here in which the client configuration file is generated by the server Microwall, enable the slide switch "Advanced Configuration" 1.

-
Assign the IP address of the VPN client from the area of the VPN tunnel 2 and select a name for the client.
-
Click on "GENERATE KEYS" 3. The Microwall generates a Public/Private key pair for the VPN client. The sensitive private key is used exclusively for generating the configuration file of the VPN client and shown only in this dialog. It is not saved.
-
Under "Endpoint (VPN server)" 4 assign the IP address and port number under which the VPN server can be reached from the internet. If the perimeter router of the customer LAN has a static public IP address, this will be used. Otherwise a dynamic DNS provider must be used to specify a reserved host name.
All other settings are prefilled the by Microwall for this quick startup and do not need to be changed. -
Clicking on the "Show QR-Code" 5 button displays the configuration file of the VPN client on the screen in the form of a QR code.
-
On the smartphone start the WireGuard app, press the Plus button and then select "SCAN FROM QR-CODE". Once the QR code has been read, assign a name for the connection and click on "Create tunnel".
-
Close the QR code on the Microwall and then click on "Add" 6 to finish creating the VPN client. To save, click in the following overview of the VPN client on "Save".

2. Releasing the VPN connection on the perimeter router
-
To transfer the VPN connection incoming from the smartphone to the Microwall, a corresponding release rule must be configured on the perimeter/DSL router. UDP packets arriving from the internet are forwarded to intranet address 192.168.10.200 of the Microwall on Port 4444 used here.
-
FritzBox 7590 example:
Under "Internet", "Releases" and "Port releases" click on "Add device for release". Select the Microwall having IP address 192.168.10.200 and then click on "New release". Click on "OK" and then on "Apply" to save the new release in the FritzBox.
3. Firewall rule in Microwall
-
Use the homepage and "VPN-Server" to navigate to "VPN rules". To set up a new release rule first click on the "+" symbol.
-
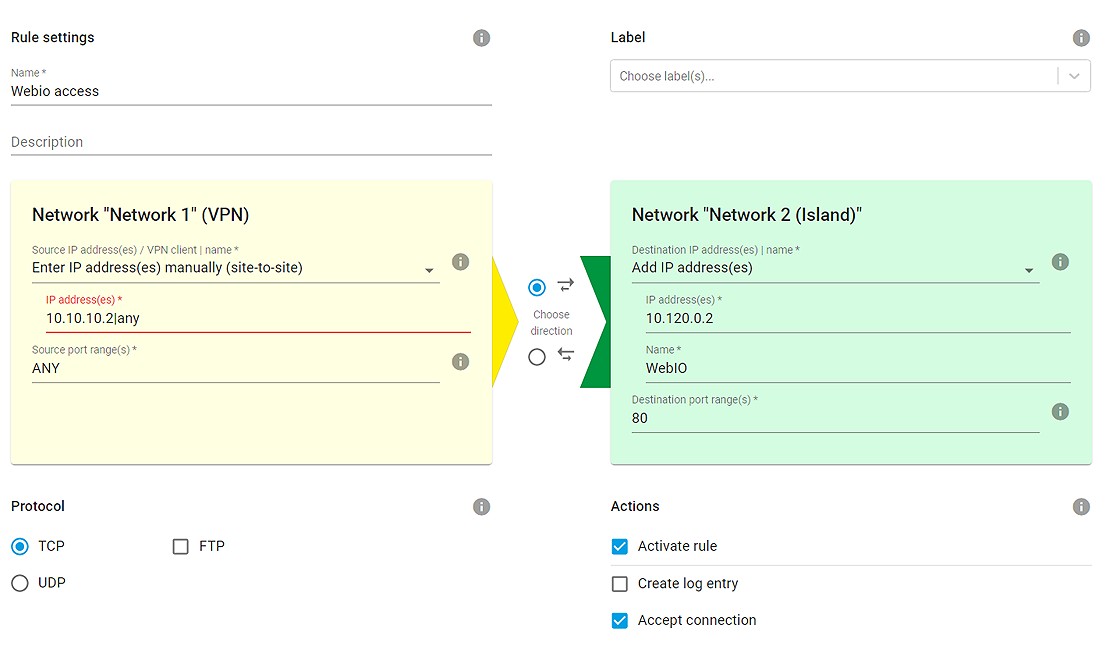
Assign a freely selectable name for the rule
-
Clicking on the direction arrow specifies that this is a connecting coming into the Web-IO island.
-
Under "Source IP" select the smartphone. Under Source Port enter "any", since this is dynamically determined on the client side and cannot be specified.
-
Under "Destination IP" enter the IP address of the Web-IO (10.110.10.2). As "Destination port" enter 80 as the default port for the web page of the Web-IO.
-
All other settings remain as the default settings in this example. To exit the dialog click on "Add" and then in the inventory list on "Save".
4. Testing the VPN connection
-
Click in the WireGuard app on the smartphone on the newly created VPN tunnel and enable the connection using the slide switch. In the "Transfer" line the number of received and sent data are displayed.
-
Start a browser on the smartphone. Using address http://10.110.10.2 go to the web page of the Web-IO.
-
The proof of the pudding is in the eating!
We are happy to provide you with a Microwall at no charge for a period of four weeks.
Request test unit -

Thomas Clever
t.clever@wut.de
You can reach our engineers by phone at +49 202/2680-110 (Mon.-Fri. 8 a.m. to 5 p.m.)