Application for the Web-IO Digital:
Control and monitor Web-IO Digital with Java
Java is a widely used, easy to learn and platform-neutral programming language. Even in the standard version it contains all the classes and methods you need for programming TCP/IP applications. This distinguishes Java as a favorite tool for creating applications which communicate with the Web-IO Digital.
Beyond a current Java environment no additional resources are needed for running.

The following program example allows you to monitor and control a Web-IO 2x Digital and provides the following functions for this:
- Switching outputs
- Manual or automatic reading of inputs, outputs and counters
- Reading and clearing individual or all counters
Preparations
- Provide power to the Web-IO and connect the IOs
- Connect the Web-IO to the network
- Assign IP addresses
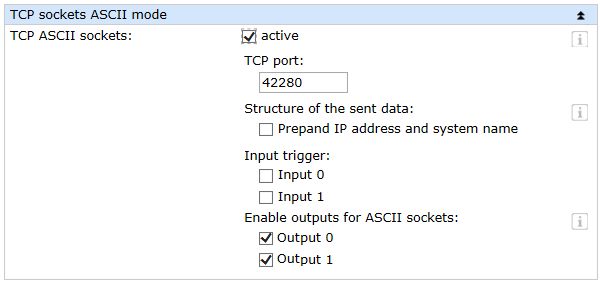
On the Web-IO in Communication channels >> Socket API activate TCP-ASCII sockets and enable outputs for switching
Combining the various operating and display elements
In the following illustration the various operating and display elements are titled with the name used in the program code. The arrangement is intended as a reference for making it easier to understand the following example.

When naming the individual objects it is helpful to use logical names. In this example the first part of the name describes the type of object and the second part the function.
Importing the required sources
At the start of any program all required sources need to be imported.
import java.awt.Color;
import java.awt.event.ActionEvent;
import java.awt.event.ActionListener;
import java.awt.event.KeyEvent;
import java.awt.event.KeyListener;
import java.io.IOException;
import java.io.InputStream;
import java.io.OutputStream;
import java.net.Socket;
import java.net.UnknownHostException;
import java.util.StringTokenizer;

import javax.swing.BorderFactory;
import javax.swing.JButton;
import javax.swing.JCheckBox;
import javax.swing.JComponent;
import javax.swing.JFrame;
import javax.swing.JLabel;
import javax.swing.JPanel;
import javax.swing.JTextField;
import javax.swing.Timer;
import javax.swing.border.BevelBorder;
2. Class extension
The "Client" class inherits all the properties of the class "Jframe" for displaying the program window, and links the interfaces "ActionListener" (detecting button events), "KeyListener" (detecting changes in text fields) and "Runnable" (enabling threads) by importing their methods.
public class Client extends JFrame implements ActionListener, KeyListener, Runnable {
  ...
}
Instatiating the graphical elements
In the case of the graphical elements (buttons, CheckBoxes, labels, panels, TextFields) global instances are created so that they are available in every method of the program.
private JButton jbConnect = new JButton("Connect");
private JButton jbDisconnect = new JButton("Disconnect");
private JButton jbOutputsRead = new JButton("Read all");
private JButton jbInputsRead = new JButton("Read all");
private JButton jbCounterRead0 = new JButton("Read");
private JButton jbCounterRead1 = new JButton("Read");
private JButton jbCounterReadAll = new JButton("Read");
private JButton jbCounterClear0 = new JButton("Clear");
private JButton jbCounterClear1 = new JButton("Clear");
private JButton jbCounterClearAll = new JButton("Clear");
private JCheckBox jcbCounterPolling = new JCheckBox("Polling");
private JCheckBox jcbOutput0 = new JCheckBox("Output 0");
private JCheckBox jcbOutput1 = new JCheckBox("Output 1");
private JCheckBox jcbOutputPolling = new JCheckBox("Polling");
private JCheckBox jcbInput0 = new JCheckBox("Input 0");
private JCheckBox jcbInput1 = new JCheckBox("Input 1");
private JCheckBox jcbInputPolling = new JCheckBox("Polling");
private JLabel jlStatusBar = new JLabel("No connection");
private JPanel jpIO = new JPanel();
private JTextField jtfInterval = new JTextField("250");
private JTextField jtfCounter0 = new JTextField("0");
private JTextField jtfCounter1 = new JTextField("0");
private JTextField jtfIP = new JTextField();
private JTextField jtfPort = new JTextField("80");
private JTextField jtfPassword = new JTextField();
Elements for data transfer and time behavior
To send data over a socket interface, in this example instances from the classes "InputStream", "OutputStream" and "Socket" are used.
private InputStream isInStream;
private OutputStream osOutStream;
private Socket soClientSocket;
The timer, which controls polling, is derived from the "Timer" (javax.swing.Timer) class.
private Timer tiPoll;The "main" method
The "main" method is automatically selected when the program is started. It invokes the constructor of the class.
              public static void main(String[] args) {
							  new Client();
							}
The constructor
The constructor is used to define size, position and behavior of display elements in the program window. The constructor is invoked without transferring parameters.
              public Client() {
							  ...
							}
Next the JPanel "jplO" is created. For this the display elements are dimensioned, or deactivated in order to generate the output state and assigned a listener, so that user inputs can be responded to. Then the elements are added to the Jpanel.
jcbOutput0.setBounds(15, 25, 80, 20);
jcbOutput0.setEnabled(false);
jcbOutput0.addActionListener(this);
jcbOutput1.setBounds(15, 50, 80, 20);
jcbOutput1.setEnabled(false);
jcbOutput1.addActionListener(this);
jbOutputsRead.setBounds(15, 75, 80, 25);
jbOutputsRead.setEnabled(false);
jbOutputsRead.addActionListener(this);
jcbOutputPolling.setBounds(15, 105, 80, 20);
jcbOutputPolling.setEnabled(false);
jcbInput0.setBounds(105, 25, 80, 20);
jcbInput0.setEnabled(false);
jcbInput0.addActionListener(this);
jcbInput1.setBounds(105, 50, 80, 20);
jcbInput1.setEnabled(false);
jcbInput1.addActionListener(this);
jbInputsRead.setBounds(105, 75, 80, 25);
jbInputsRead.setEnabled(false);
jbInputsRead.addActionListener(this);
jcbInputPolling.setBounds(105, 105, 80, 20);
jcbInputPolling.setEnabled(false);
JLabel jlCounter0 = new JLabel("Counter 0");
jlCounter0.setBounds(190, 25, 55, 20);
jlCounter0.setEnabled(false);
JLabel jlCounter1 = new JLabel("Counter 1");
jlCounter1.setBounds(190, 50, 55, 20);
jlCounter1.setEnabled(false);
JLabel jlCounterAll = new JLabel("Counter All");
jlCounterAll.setBounds(190, 77, 70, 20);
jlCounterAll.setEnabled(false);
JLabel jlInterval = new JLabel("Interval");
jlInterval.setBounds(190, 105, 50, 20);
jlInterval.setEnabled(false);
tfCounter0.setBounds(250, 23, 40, 25);
jtfCounter0.setEnabled(false);
jtfCounter0.setHorizontalAlignment(JTextField.CENTER);
jtfCounter0.setEditable(false);
jtfCounter1.setBounds(250, 48, 40, 25);
jtfCounter1.setEnabled(false);
jtfCounter1.setHorizontalAlignment(JTextField.CENTER);
jtfCounter1.setEditable(false);
jtfInterval.setBounds(250, 102, 40, 25);
jtfInterval.setEnabled(false);
jtfInterval.setHorizontalAlignment(JTextField.CENTER);
jtfInterval.addKeyListener(this);
jbCounterRead0.setBounds(295, 23, 65, 25);
jbCounterRead0.setEnabled(false);
jbCounterRead0.addActionListener(this);
jbCounterRead1.setBounds(295, 48, 65, 25);
jbCounterRead1.setEnabled(false);
jbCounterRead1.addActionListener(this);
jbCounterReadAll.setBounds(295, 75, 65, 25);
jbCounterReadAll.setEnabled(false);
jbCounterReadAll.addActionListener(this);
jcbCounterPolling.setBounds(295, 105, 80, 20);
jcbCounterPolling.setEnabled(false);
jbCounterClear0.setBounds(360, 23, 65, 25);
jbCounterClear0.setEnabled(false);
jbCounterClear0.addActionListener(this);
jbCounterClear1.setBounds(360, 48, 65, 25);
jbCounterClear1.setEnabled(false);
jbCounterClear1.addActionListener(this);
jbCounterClearAll.setBounds(360, 75, 65, 25);
jbCounterClearAll.setEnabled(false);
jbCounterClearAll.addActionListener(this);
jpIO.setLayout(null);
jpIO.setBounds(5, 5, 440, 135);
jpIO.setBorder(BorderFactory.createTitledBorder(BorderFactory.createLineBorder(Color.black), "Input/ Output Control"));
jpIO.add(jcbOutput0);
jpIO.add(jcbOutput1);
jpIO.add(jbOutputsRead);
jpIO.add(jcbOutputPolling);
jpIO.add(jcbInput0);
jpIO.add(jcbInput1);
jpIO.add(jbInputsRead);
jpIO.add(jcbInputPolling);
jpIO.add(jlCounter0);
jpIO.add(jlCounter1);
jpIO.add(jlCounterAll);
jpIO.add(jlInterval);
jpIO.add(jtfCounter0);
jpIO.add(jtfCounter1);
jpIO.add(jtfInterval);
jpIO.add(jbCounterRead0);
jpIO.add(jbCounterRead1);
jpIO.add(jbCounterReadAll);
jpIO.add(jcbCounterPolling);
jpIO.add(jbCounterClear0);
jpIO.add(jbCounterClear1);
jpIO.add(jbCounterClearAll);
The following program fragment creates the operating and display elements which are combined on the surface under the heading of "Connection Control". The JPanel to which these elements are added is locally instantiated, since there is no longer access outside the constructor.
JLabel jlIP = new JLabel("IPAddress");
jlIP.setBounds(20, 40, 120, 20);
jtfIP.setBounds(20, 60, 120, 26);
jtfIP.setHorizontalAlignment(JTextField.CENTER);
JLabel jlPort = new JLabel("Port");
jlPort.setBounds(145, 40, 70, 20);
jtfPort.setBounds(145, 60, 70, 26);
jtfPort.setHorizontalAlignment(JTextField.CENTER);
JLabel jlPassword = new JLabel("Password");
jlPassword.setBounds(220, 40, 95, 20);
jtfPassword.setBounds(220, 60, 95, 26);
jtfPassword.setHorizontalAlignment(JTextField.CENTER);
jbConnect.setBounds(330, 25, 100, 25);
jbConnect.addActionListener(this);
jbDisconnect.setBounds(330, 60, 100, 25);
jbDisconnect.setEnabled(false);
jbDisconnect.addActionListener(this);
JPanel jpConnect = new JPanel();
jpConnect.setLayout(null);
jpConnect.setBounds(5, 140, 440, 95);
jpConnect.setBorder(BorderFactory.createTitledBorder(BorderFactory.createLineBorder(Color.black), "Connection Control"));
jpConnect.add(jlIP);
jpConnect.add(jlPort);
jpConnect.add(jlPassword);
jpConnect.add(jtfIP);
jpConnect.add(jtfPort);
jpConnect.add(jtfPassword);
jpConnect.add(jbConnect);
jpConnect.add(jbDisconnect);
The status bar provides information while the program is running as to the status of the socket connection to a Web-IO. The default value "No Connection" is assigned to it even during instantiation. In the constructor the layout is defined in terms of size, position and type of border.
jlStatusBar.setLayout(null);
jlStatusBar.setBounds(1, 240, 450, 20);
jlStatusBar.setBorder(BorderFactory.createBevelBorder(BevelBorder.LOWERED));
Finally the window properties are set and the previously created elements added. In the last step the program window is made visible. This concludes the initialization phase, and the program is now ready to run.
							setTitle("Web-IO ASCII Client");
							setLocation(400, 300);
							setLayout(null);
							setSize(460, 290);
							setResizable(false);
							setDefaultCloseOperation(JFrame.EXIT_ON_CLOSE);
							add(jpIO);
							add(jpConnect);
							add(jlStatusBar);
							setVisible(true);
Process button and timer events
Event processing (general): If an ActionListener was registered for display and operating elements (e.g. buttons and TextFields), the "actionPerformed" method is invoked when events are triggered. The transferred parameter contains among other things the information as to which component triggered the event.
public void actionPerformed(ActionEvent arg0) {
  ...
}
Opening a connection: Clicking on the "Connect" button causes a connection to be opened to the specified Web-IO. The display and operating elements are activated or deactivated corresponding to the state, and the status bar indicates the progress of the connection establishment. If the socket was successfully opened and the streams for data input and data output successfully generated, a thread is started which processes arriving data. A timer, which requests data according to the stipulated polling behavior, is started. If an error occurs while the connection is being opened, an exception is used to exit.
if (arg0.getSource() == jbConnect) {
  jbConnect.setEnabled(false);
  jlStatusBar.setText("Trying to connect to " + jtfIP.getText());
  try {
    soClientSocket = new Socket(jtfIP.getText(),Integer.parseInt(jtfPort.getText()));
    isInStream = soClientSocket.getInputStream();
    osOutStream = soClientSocket.getOutputStream();
    new Thread(this).start();
    tiPoll = new Timer(Integer.parseInt(jtfInterval.getText()),this);
    tiPoll.start();
    for (int i = 0; i < jpIO.getComponentCount();i++) {
      ((JComponent) jpIO.getComponent(i)).setEnabled(true);
    }
    jbDisconnect.setEnabled(true);
    jlStatusBar.setText("Connected to " + jtfIP.getText());
    return;
  }
  catch (NumberFormatException e) {
    e.printStackTrace();
  }
  catch (UnknownHostException e) {
    e.printStackTrace();
  }
  catch (IOException e) {
    e.printStackTrace();
  }
  jbConnect.setEnabled(true);
  jlStatusBar.setText("Error - No Connection");
}
Intentional disconnection: Clicking on the "Disconnect" button invokes the "disconnect" method. This contains instructions which close the connection in a controlled manner and prepare the program for accepting a new connection. Since disconnection can also be introduced by means of an exception, the disconnect takes place in a separate method and not within the "actionPerformed" method.
else if (arg0.getSource() == jbDisconnect) {
  disconnect();
}
Switch outputs: The respective output can be switched by manipulating the checkboxes "jcbOutput0" and "jcbOutput1". If one of the checkboxes triggers an event, a string is sent to the Web-IO which, depending on the set status, implements the selection.
else if (arg0.getSource() == jcbOutput0) {
  if (jcbOutput0.isSelected()) {
    write("GET /outputaccess0?PW=" + jtfPassword.getText() + "&State=ON&");
  }
  else {
    write("GET /outputaccess0?PW=" + jtfPassword.getText() + "&State=OFF&");
  }
}
else if (arg0.getSource() == jcbOutput1) {
  if (jcbOutput1.isSelected()) {
    write("GET /outputaccess1?PW=" + jtfPassword.getText() + "&State=ON&");
  }
  else {
    write("GET /outputaccess1?PW=" + jtfPassword.getText() + "&State=OFF&");
  }
}
Read inputs and outputs, read and clear counters: The in- and outputs can be completely read by using a button. For this a corresponding command string is sent to the Web-IO. This works the same way with the counters. Each button has a command string associated with it which triggers the corresponding result.
else if (arg0.getSource() == jbOutputsRead) {
  write("GET /output?PW=" + jtfPassword.getText() + "&");
}
else if (arg0.getSource() == jbInputsRead) {
  write("GET /input?PW=" + jtfPassword.getText() + "&");
}
else if (arg0.getSource() == jbCounterRead0) {
  write("GET /counter0?PW=" + jtfPassword.getText() + "&");
}
else if (arg0.getSource() == jbCounterRead1) {
  write("GET /counter1?PW=" + jtfPassword.getText() + "&");
}
else if (arg0.getSource() == jbCounterReadAll) {
  write("GET /counter?PW=" + jtfPassword.getText() + "&");
}
else if (arg0.getSource() == jbCounterClear0) {
  write("GET /counterclear0?PW=" + jtfPassword.getText() + "&");
}
else if (arg0.getSource() == jbCounterClear1) {
  write("GET /counterclear1?PW=" + jtfPassword.getText() + "&");
}
else if (arg0.getSource() == jbCounterClearAll) {
  write("GET /counterclear?PW=" + jtfPassword.getText() + "&");
}
Polling: The timer, which was started when the connection was opened, also triggers an event (cyclical). Depending on the status of the three polling checkboxes, at each cycle the outputs, inputs and counters are polled.
else if (arg0.getSource() == tiPoll) {
  if (jcbOutputPolling.isSelected()) {
    write("GET /output?PW=" + jtfPassword.getText() + "&");
  }
  if (jcbInputPolling.isSelected()) {
    write("GET /input?PW=" + jtfPassword.getText() + "&");
  }
  if (jcbCounterPolling.isSelected()) {
    write("GET /counter?PW=" + jtfPassword.getText() + "&");
  }
}
Process changes in text fields
Changing the polling interval: Changes in the polling interval are active without being confirmed. A change is detected using a KeyListener, which is added to the TextField "tfInterval". This requires implementing the interface methods ("keyPressed", "KeyReleased" and "keyTyped"). When changing the contents of the TextField the updated value is converted into Int format and passed to the timer. If the contents of the TextField cannot be converted into an integer, the exception is used to exit. The polling rate is not changed in this case.
public void keyPressed(KeyEvent arg0) {
}
public void keyReleased(KeyEvent arg0) {
  try {
    tiPoll.setDelay(Integer.parseInt(jtfInterval.getText()));
    } catch (NumberFormatException e) {
  }
}
public void keyTyped(KeyEvent arg0) {
}
Data reception and processing
The "run" method is started when a socket connection is opened and runs as a thread quasi-parallel to the actual program. In this method the socket is checked continuously in a while loop for arriving data. When the connection is aborted the value -1 is read, which is the abort criterion of the loop. If a value >0 is received, this is converted according to the ASCII table into a character and added to the receive string. If a 0 is received, the string is received in full and processing begins. The start of any string ("output;", "input;", "counter," and "counter") indicates the assignment of the data. After the information is identified, it is parsed and shown.
public void run() {
  int iInput, iState;
  String sIn = "";
  StringTokenizer stToken;
  try {
    while ((iInput = isInStream.read()) != -1) {
      if (iInput > 0) {
        sIn += (char) iInput;
      }
      else {
        if (sIn.startsWith("input")) {
          iState = Integer.parseInt(sIn.replaceFirst("input;", ""));
          jcbInput0.setSelected(((iState & 1) > 0) ? true : false);
          jcbInput1.setSelected(((iState & 2) > 0) ? true : false);
        }
        else if (sIn.startsWith("output")) {
          iState = Integer.parseInt(sIn.replaceFirst("output;",""));
          jcbOutput0.setSelected(((iState & 1) > 0) ? true : false);
          jcbOutput1.setSelected(((iState & 2) > 0) ? true : false);
        }
        else if (sIn.startsWith("counter")) {
          if (sIn.startsWith("counter;")) {
            sIn = sIn.replaceFirst("counter;", "");
            stToken = new StringTokenizer(sIn, ";");
            jtfCounter0.setText(stToken.nextToken());
            jtfCounter1.setText(stToken.nextToken());
          }
          else {
            stToken = new StringTokenizer(sIn, ";");
            if (stToken.nextToken().equals("counter0")) {
              jtfCounter0.setText(stToken.nextToken());
            }
            else {
              jtfCounter1.setText(stToken.nextToken());
            }
            sIn = sIn.replaceFirst("counter", "");
          }
        }
        sIn = "";
      }
    }
    disconnect();
  }
  catch	(IOException e) {
  }
}
Send command strings
The "write" method is used to write the transferred command strings to the socket.Writing is done in two steps. The "write" instruction transfers the string to the socket as a byte chain. The "flush" instruction sends the bytes to the peer. If an error occurs during this procedure, the exception is used to exit.
private void write(String sOutput) {
  try {
    osOutStream.write(sOutput.getBytes());
    osOutStream.flush();
  }
  catch (IOException e) {
  }
}
11. Disconnecting
The instructions for proper opening of a connection are located in a separate method which is invoked by clicking on the "Disconnect" button and by invoking a disconnect. First the "Disconnect" button is deactivated, the message for the disconnect output in the status line and the polling timer stopped. Then the socket is closed. If this procedure is successful, all input and display elements are set to their initial state. If closing is unsuccessful, the interface is set again for an existing connection.
private void disconnect() {
  jbDisconnect.setEnabled(false);
  jlStatusBar.setText("Trying to disconnect from " + jtfIP.getText());
  try {
    tiPoll.stop();
    soClientSocket.close();
    for (int i = 0; i < jpIO.getComponentCount(); i++) {
      ((JComponent)jpIO.getComponent(i)).setEnabled(false);
    }
    jbConnect.setEnabled(true);
    jlStatusBar.setText("No connection");
    return;
  }
  catch (IOException e) {
    e.printStackTrace();
  }
  jbDisconnect.setEnabled(true);
  jlStatusBar.setText("Error - Connected to " + jtfIP.getText());
}
The sample program supports all common functions of the Web-IO in command string mode, optimized for the Web-IO 2x Digital Input, 2x Digital Output. For the other Web-IO models you may have to make adaptations to the program. Additional program examples for socket programming can be found on the tool pages for the Web-IO. A detailed description for the socket interface of the Web-IO Digital models can be found in the reference manual.


