Tutorial for the Web-IO Digital:
Control and monitor the Web-IO Digital with Visual C#
Visual C++ was until recently one of the most widely used development platforms for creating Windows applications. In the meantime, more and more programmers are working with the .Net Framework and creating their applications in C#.

Using the following C# program example you can represent your Web-IO Digital with its inputs and outputs in a Windows application. You can also switch the Web-IO outputs.
Preparations
- Provide power to the Web-IO and connect the IOs
- Connect the Web-IO to the network
- Assign IP addresses
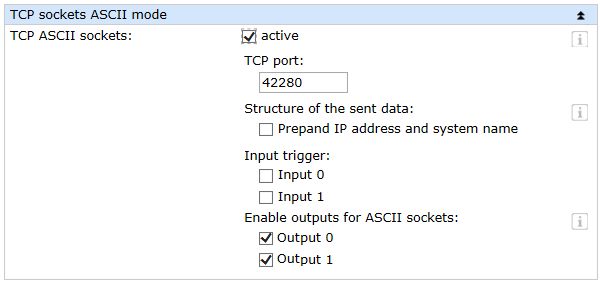
On the Web-IO in Communication channels >> Socket API activate TCP-ASCII sockets and enable outputs for switching
Combine the various operating elements and display objects in the form

Importing resources and declaring member variables
Firstly, all classes required for the network connection and the GUI are imported.
using System;
using System.Windows.Forms;
using System.Net;
using System.Net.Sockets;
using System.Text;
Then the application components and important variables for a TCP connection are declared as member variables, thereby making them accessible to the class methods.
  public class mainWindow : System.Windows.Forms.Form
  {
    private CheckBox cb_Output0;
    private CheckBox cb_Output1;
    private CheckBox cb_Input0;
    private CheckBox cb_Input1;
    private CheckBox cb_Polling_Counter;
    private CheckBox cb_Polling_Outputs;
    private CheckBox cb_Polling_Inputs;
    private Button bt_Readall_Outputs;
    private Button bt_Readall_Inputs;
    private Button bt_Clear_Counter0;
    private Button bt_Clear_Counter1;
    private Button bt_Clearall_Counter;
    private Button bt_Read_Counter0;
    private Button bt_Read_Counter1;
    private Button bt_Readall_Counter;
    private Label lb_Counter0;
    private Label lb_Counter1;
    private Label lb_Intervall;
    private TextBox tb_Counter0;
    private TextBox tb_Counter1;
    private TextBox tb_Intervall;
    private Button bt_Connect;
    private Button bt_Disconnect;
    private TextBox tb_Password;
    private TextBox tb_Port;
    private TextBox tb_IP;
    private GroupBox gb_ioControlBox;
    private GroupBox gb_conControlBox;
    private StatusBar statusBar;

    private Socket client;
    private int intervall;
    private byte[] buffer = new byte[256];
    private System.Windows.Forms.Timer counter;
    private System.Windows.Forms.Timer outputs;
    private Label label2;
    private Label label1;
    private Label label3;
    private System.Windows.Forms.Timer inputs;
Starting the program
Setting up the operating elementsThe group with the operating elements for the Web-IO is first blocked from operation. As soon as a connection is established, all elements are enabled which have a meaningful format.
The name of the respective operating element is derived from the element itself depending on the context. The first two characters in the name stand for the element type (cb -> Checkbox, bt -> Button, gb -> Groupbox and tb-> TextBox).
  public mainWindow()
  {
    InitializeComponent();
    gb_ioControlBox.Enabled = false;
    bt_Disconnect.Enabled = false;
    cb_Input0.Enabled = false;
    cb_Input1.Enabled = false;
    tb_Counter0.Enabled = false;
    tb_Counter1.Enabled = false;
  }
Connection control
Establishing the connectionAfter entering the IP address for the Web-IO in the text field tb_IP and Port 42280 in the text field tb_Port, clicking on the bt_Connect button allows a connection to be opened. If no IP address or port is entered, a message is displayed in the status bar
Opening the connectionNow to open a TCP connection a new socket is created and initialized. The IP address and port number are summarized in an IP endpoint. The BeginConnect call is used to transfer the IP endpoint.
So that the program can run asynchronously, it does not wait for events but rather uses callback routines. Callback methods are initialized when a process is started and called, when the corresponding event takes place, in other words for example when the connection is opened, when sending or receiving.
  private void bt_Connect_Click(object sender, System.EventArgs e)
  {
    try
    {
      if((tb_IP.Text != "") && (tb_Port.Text != ""))
      {
        client = new Socket(AddressFamily.InterNetwork, SocketType.Stream, ProtocolType.Tcp);
        IPEndPoint ipep = new IPEndPoint(IPAddress.Parse(tb_IP.Text), int.Parse(tb_Port.Text));
        client.BeginConnect(ipep, new AsyncCallback(connectCallback), client);
      }
      else
        statusBar.Text = "IP and Port needed!";
    }
			catch(SocketException)
			{ statusBar.Text = "Connection not possible!"; }
  }
In the following we show the callback routine which is called when the connection is opened. The application immediately begins to make itself ready to receive. The callback routine "receiveCallback" is initialized, which is further explained below.
  private void connectCallback(IAsyncResult ar)
  {
    try
    {
      client = (Socket) ar.AsyncState;
      client.EndConnect(ar);
      connectupdatedisplay();
      intervall = 1000;
      client.BeginReceive(buffer, 0, 255, SocketFlags.None, new AsyncCallback(receiveCallback), client);
    }
    catch(Exception)
    { disconnect();
    }
  }
In addition the connectupdatedisplay() procedure is called to enable all the needed operating elements of the application and to disable the Connect button.
In the current version of C# it is no longer allowed to access graphical elements of another thread (form) from a thread (here the Callback function).
The workaround here is to use delegates and invoke.
In the following we show the callback routine which is called when the connection is opened. The application immediately begins to make itself ready to receive. The callback routine "receiveCallback" is initialized, which is further explained below.
  delegate void delegateSub();

  private void connectupdatedisplay()
  {
    if (InvokeRequired)
    {
      BeginInvoke(new delegateSub(connectupdatedisplay), new object[] { });
      return;
    }
    statusBar.Text = "Connected!";
    gb_ioControlBox.Enabled = true;
    bt_Disconnect.Enabled = true;
    bt_Connect.Enabled = false;
  }
Disconnecting
The connection remains open until it is ended by the user clicking on the Disconnect button, or the Web-IO closes the connection.
  private void bt_Disconnect_Click(object sender, System.EventArgs e)
  {
    try
    {
      client.Shutdown(SocketShutdown.Both);
      client.Close();
      disconnectupdatedisplay();
    }
    catch (Exception)
    {
      statusBar.Text = "Not able to disconnect!";
    }
  }
Even if the connection is opened by the Web-IO the application should close the socked used and all elements should be restored to their initial condition. It should then no longer be possible to actuate the Disconnect button.
  private void disconnect()
  {
    try
    {
      client.Shutdown(SocketShutdown.Both);
      client.Close();
      disconnectupdatedisplay();
    }
    catch (Exception)
    {
       statusBar.Text = "Not able to disconnect!";
    }
  }
To ensure thread-secure access, resetting the form elements has been moved to the disconnectupdatedisplay() procedure.
  private void disconnectupdatedisplay()
  {
    if (InvokeRequired)
    {
      BeginInvoke(new delegateSub(disconnectupdatedisplay), new object[] { });
      return;
    }
    statusBar.Text = "Disconnected!";
    gb_ioControlBox.Enabled = false;
    bt_Disconnect.Enabled = false;
    bt_Connect.Enabled = true;
  }
Now the connection is closed again and the application reset to its initial state.
Operation and communication from the client side
As soon as a connection is made with the Web-IO, the user can use the corresponding program elements to send commands to the Web-IO.
Sending commands
When sending a message to the Web-IO, a callback routine is invoked just as in the case of receiving.
							private void sendCallback(IAsyncResult ar)
  private void sendCallback(IAsyncResult ar)
  {
    try
    {
      Socket tmp_client = (Socket) ar.AsyncState;
      int bytessend = tmp_client.EndSend(ar);
    }
    catch(Exception)
    {
      statusBar.Text = "Error while sending";
    }
  }
Setting the outputs
The outputs on the Web-IO can be switched using the two checkboxes IDC_OUTPUT0 and IDC_OUTPUT1. The checkbox notes when it was clicked and then triggers an action. Depending on whether the checkbox is already set, the output is either set to ON or OFF.
  private void cb_Output0_CheckedChanged(object sender, System.EventArgs e)
  {
    if(cb_Output0.Checked)
      send("GET /outputaccess0?PW=" + tb_Password.Text + "&State=ON&");
    else
      send("GET /outputaccess0?PW=" + tb_Password.Text + "&State=OFF&");
  }

  private void cb_Output1_CheckedChanged(object sender, System.EventArgs e)
  {
    if(cb_Output1.Checked)
      send("GET /outputaccess1?PW=" + tb_Password.Text + "&State=ON&");
    else
      send("GET /outputaccess1?PW=" + tb_Password.Text + "&State=OFF&");
  }
Query output/input status
  private void bt_Readall_Outputs_Click(object sender, System.EventArgs e)
  {
    send("GET /output?PW=" + tb_Password.Text + "&");
  }

  private void bt_Readall_Inputs_Click(object sender, System.EventArgs e)
  {
    send("GET /input?PW=" + tb_Password.Text + "&");
  }
Querying or clearing counters
The following method sends a request to a particular counter and requests a reply with the current state of the counter, also clearing the count.
  private void bt_Read_Counter0_Click(object sender, System.EventArgs e)
  {
    send("GET /counter0?PW=" + tb_Password.Text + "&");
  }

  private void bt_Read_Counter1_Click(object sender, System.EventArgs e)
  {
    send("GET /counter1?PW=" + tb_Password.Text + "&");
  }

  private void bt_Clear_Counter0_Click(object sender, System.EventArgs e)
  {
    send("GET /counterclear0?PW=" + tb_Password.Text + "&");
  }

  private void bt_Clear_Counter1_Click(object sender, System.EventArgs e)
  {
    send("GET /counterclear1?PW=" + tb_Password.Text + "&");
  }
Of course all the counter states can also be queried or cleared using a command.
  private void bt_Readall_Counter_Click(object sender, System.EventArgs e)
  {
    send("GET /counter?PW=" + tb_Password.Text + "&");
  }

  private void bt_Clearall_Counter_Click(object sender, System.EventArgs e)
  {
    send("GET /counterclear?PW=" + tb_Password.Text + "&");
  }
Data reception by the Web-IO and processing
Structure of the receive data- All commands and requests to the Web-IO are acknowledged with a reply string. The replies have a specific structure depending on the type:
- For the outputs: output;<binary value of the output status in hexadecimal format>
- For a special output: outputx;<ON or OFF>
- For the inputs: input;<binary value of the input status in hexadecimal format>
- For a special input inputx;<ON or OFF>
- Then there is the reply string for a counter, which looks as follows.
- Counter: counterx;<decimal counter state>
- or counter;<decimal counter state 0 >; <decimal counter state 0 >; ... if you want to read all the counters at one time.
- All reply strings are finished off with a 0 byte.
In our application receiving such a message uses the receiveCallback() method. The feature of this method is event-driven calling. This is done as soon as the Web-IO sends data to the application.
  private void receiveCallback(IAsyncResult ar)
  {
    int bytesRead;
    string rcv = string.Empty;
    try
    { bytesRead = client.EndReceive(ar);
      rcv = Encoding.ASCII.GetString(buffer);
      client.BeginReceive(buffer, 0, 255, SocketFlags.None, new AsyncCallback(receiveCallback), client);
    }
    catch (Exception)
    {
      bytesRead = 0;
    }
    if (bytesRead == 0)
    {
      if (client.Connected)
      {
        disconnect();
      }
    }
    else if (rcv != null)
    {
      IOupdatedisplay(rcv.Substring(0, bytesRead - 1));
    }
	}
Processing the received data
The reply string is read and sent to the thread-safe procedure IOupdatedisplay.
  delegate void delegateIOSub(string rcv);

  private void IOupdatedisplay(string rcv)
  {
    if (InvokeRequired)
    {
      BeginInvoke(new delegateIOSub(IOupdatedisplay), new object[] { rcv });
      return;
    }
    if (rcv[0] == ’o’)
    {
      int i = Int32.Parse(rcv.Substring(7), System.Globalization.NumberStyles.HexNumber);
      if((i & 1) == 1)
        cb_Output0.Checked = true;
      else
        cb_Output0.Checked = false;
      if((i & 2) == 2)
        cb_Output1.Checked = true;
      else
        cb_Output1.Checked = false;
    }
    if(rcv[0] == ’i’)
    {
      int i = Int32.Parse(rcv.Substring(6), System.Globalization.NumberStyles.HexNumber);
      if ((i & 1) == 1)
        cb_Input0.Checked = true;
      else
        cb_Input0.Checked = false;
      if((i & 2) == 2)
        cb_Input1.Checked = true;
      else
        cb_Input1.Checked = false;
    }
    if(rcv[0] == ’c’)
    {
      if(rcv[7] == ’0’)
        tb_Counter0.Text = rcv.Substring(9);
      if(rcv[7] == ’1’)
        tb_Counter1.Text = rcv.Substring(9);
      if(rcv[7] == ’;’)
      readAndClearCounter(rcv.Substring(8));
    }
  }
Since all counter states can be read or reset using a command, a method also needs to be implemented for processing the reply string from the Web-IO such that each counter in the application has its specific counter state assigned to it.
  private void readAndClearCounter(string data)
  {
    int j = 0;
    string[] counter = new string[2];
    for(int i = 0; i < data.Length; i++)
    {
      if((data[i].CompareTo(’;’)) == 0)
        j++;
      else
        counter[j] += data[i].ToString();
    }
    tb_Counter0.Text = counter[0];
    tb_Counter1.Text = counter[1];
  }
7. Polling
Cyclical polling of particular valuesIt is desirable that the status of an individual component be updated by the component itself, so that the application always shows the current status. For this the program uses a timer which sends cyclical queries to the Web-IO at a user-defined time interval.
The time interval can be specified in the field tb_Intervall.
Of course this also catches cases where the user enters a nonsense value, such as a negative time value.
  private void tb_Intervall_TextChanged(object sender, System.EventArgs e)
  {
    try
    {
      if(Convert.ToInt32(tb_Intervall.Text) > 0)
      {
        intervall = Convert.ToInt32(tb_Intervall.Text);
        statusBar.Text = "New range: " + intervall.ToString() + " ms!";
      }
      else
        statusBar.Text = "Only positiv Integer allowed!";
    }
    catch(Exception)
    {
     statusBar.Text = "Only positiv Integer allowed!";
    }
  }
To carry out cyclical polling of the Web-IO states, you can select from among polling the outputs, the inputs or the counters.
Each polling variant has its own timer initialized.
Actuating the checkbox cb_Polling_Outputs causes polling to be applied to the outputs. The corresponding timer is initialized.
  private void cb_Polling_Outputs_CheckedChanged(object sender, System.EventArgs e)
  {
    if(cb_Polling_Outputs.Checked)
    {
      outputs = new System.Windows.Forms.Timer();
      outputs.Interval = intervall;
      outputs.Start();
      outputs.Tick += new EventHandler(timer_handler);
    }
    else
      outputs.Stop();
  }
The same applies to inputs and counters.
  private void cb_Polling_Inputs_CheckedChanged(object sender, System.EventArgs e)
  {
    if(cb_Polling_Inputs.Checked)
    {
      inputs = new System.Windows.Forms.Timer();
      inputs.Interval = intervall;
      inputs.Start();
      inputs.Tick += new EventHandler(timer_handler);
    }
    else
      inputs.Stop();
  }

  private void cb_Polling_Counter_CheckedChanged(object sender, System.EventArgs e)
  {
    if(cb_Polling_Counter.Checked)
    {
      counter = new System.Windows.Forms.Timer();
      counter.Interval = intervall;
      counter.Start();
      counter.Tick += new EventHandler(timer_handler);
    }
    else
      counter.Stop();
  }
In this method the respective event of the timer which has just reported is captured and assigned to a certain action.
  private void timer_handler(object sender, System.EventArgs e)
  {
    if(sender == counter) bt_Readall_Counter_Click(sender, e);
    if(sender == outputs) bt_Readall_Outputs_Click(sender, e);
    if(sender == inputs) bt_Readall_Inputs_Click(sender, e);
  }
The sample program supports all common functions of the Web-IO in command string mode, optimized for the Web-IO 2x Digital Input, 2x Digital Output. For the other Web-IO models you may have to adapt the program. Additional program examples for socket programming can be found on the tool pages for the Web-IO. A detailed description for the socket interface of the Web-IO Digital models can be found in the reference manual.


