Application for Web-IO Analog
Digital display
Store measurement values on a database server
More links
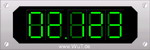
The value measured by the Web-IO Analog can be simply visualized on a Web page using JavaScript and a few images. Incorporation of the Web-IO applet provides for continuous updating of the display.
Using the following copy&paste example you can represent a current value measured by your Web-IO Analog (Model 57421, 57642 or 57643) on a Web page in the form of a digital display. You can also find a corresponding sample Web page for displaying two measured values
You have already provided your Web-IO Analog
- with power,
- connected it to your network,
- assigned it an IP address - which with WuTility is no problem.
Copy the JavaScript (shown in blue) from the following example into the <head> area of your Web page.
<html>
	<head>
		<title>Digitale Anzeige</title>
		<script language="JavaScript" type="text/javascript">
		<!--
		var valuevolt;
		voltdigit = new Array(5);
		document.write("<img border=’0’ src=’display_400.gif’ style=’position:absolute; top:10px; left:10px’>");
		document.write("<img border=’0’ src=’dot_400.gif’ style=’position:absolute; top:37px; left:180px’>");
		voltdigit[0] = new multipic(201,"digit_400_","gif",9,37,80,"nolink");
		voltdigit[1] = new multipic(202,"digit_400_","gif",9,37,130,"nolink");
		voltdigit[2] = new multipic(203,"digit_400_","gif",9,37,190,"nolink");
		voltdigit[3] = new multipic(204,"digit_400_","gif",9,37,240,"nolink");
		voltdigit[4] = new multipic(205,"digit_400_","gif",9,37,290,"nolink");
		function multipic(id, img_name, img_ext, img_count, ypos, xpos, link)
			{
			img_count++;
			this.multipics = new Array( img_count );
			this.multipic_count = img_count;
			this.multipic_id = id; // class variables
			for (i=0; i<img_count; i++)
				{
				this.multipics[i] = new Image();
				this.multipics[i].src = img_name+i+’.’+img_ext;
				}
				this.Set = picSet; // Class method
				if (link == "nolink")
					{
					document.write("<img id=’"+this.multipic_id+"’ style=position:absolute;top:"+ypos+"px;left:"+xpos+"px src="+this.multipics[0].src+" border=0>");
					}
				else
					{
					document.write("<a href=’javascript:" + link + "(" + id + ");’><img id=’"+this.multipic_id+"’ style=position:absolute;top:"+ypos+"px;left:"+xpos+"px src="+this.multipics[0].src+" border=0></a>");
					}
			}
		function picSet(iCount)
			{
			for (i=0; i<this.multipic_count; i++)
				{
				if(iCount==i)
					{
					document.getElementById(this.multipic_id).src = this.multipics[i].src;
					}
				}
			}
		function sensorChanged( iDevice, iSensor, iVal )
			{
			var maxdigits = 5;
			var i=maxdigits;
			var digitvalue;
			if (iSensor==1)
				{
				valuevolt = iVal;
				iVal=valuevolt*1000
				do
					{
					i--
					digitvalue = parseInt(iVal/Math.pow(10,i));
					voltdigit[maxdigits-1-i].Set(digitvalue);
					iVal=iVal-digitvalue*Math.pow(10,i);
					}
				while(i>0)
				}
			}
		</script>
	</head>
...- Copy the applet data (in blue) to the <body> area of your Web page.
- Insert the IP address of your Web-IO Analog.
...
	<body>
		<applet name="Analog" archive="A.jar" code="A.class" codebase="http://10.40.22.27" height="0" width="0" mayscript>
		<param name="device" value="0">
		<param name="showerrors" value="off">
		<param name="sensorpolling" value="on">
		<param name="pollingrate" value="500">
		Java ist nicht aktiviert oder wird nicht unterstützt
		</applet>
	</body>
</html>- Now all you need is the images associated with the display object, which we have provided here for downloading: .zip (approx. 21 kB).
- Please place the images in the directory in which the Web page with the JavaScript and applet data are located.