Application for the Web-IO Digital:
iPhone optimized Web pages for Web-IO applications
The iPhone as a remote controller
The techniques shown here refer to the Apple iPhone, but they can be adapted to any Internet-capable cell phone by changing the display size to the corresponding display resolution. The only prerequisite is the ability to support JavaScript and especially HTTP Request Objects (AJAX technology).
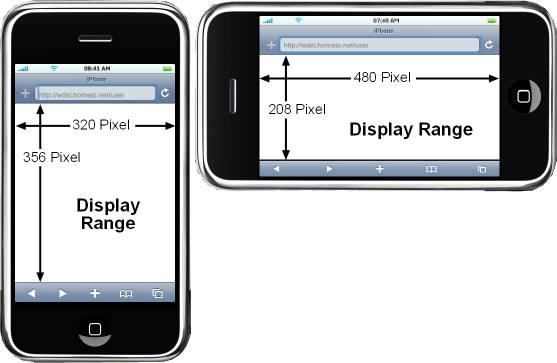
As for the iPhone, there are two variations:

To keep creation of the Web page simple, you should decide on a variation and construct the Web page accordingly.
If there is WLAN access, the example shown functions on all iPod Touch models!
Example: Controlling roller shutters with the iPhone
In this example the switching inputs on an electric roller shutter are controlled using the outputs of a Web-IO 2xDigital from the iPhone.

As already noted, for Web pages which are optimized especially for the iPhone it is important to define the HTML elements size and position to pixel accuracy.

The drawing should help in arranging the elements and undrestanding the following source text.
						<user.htm>
							<html>
								<head>
									<title>Aktuelles Klima</title>
									<meta http-equiv="Content-Type" content="text/html; charset=iso-8859-1">
									<meta name="viewport"content="width=320" />
									<style type="text/css">
								<!--
									* { font-family:Verdana, Helvetica;}
									.description {
												position:absolute;
												text-align:center;
												font-size:18px;
												left:0px;
												height:25px;
												width:320px;
												}
									.confirm	{
												position:absolute;
												background-color:#99CCFF;
												left:0px;
												height:160px;
												width:320px;
												}
									.buttons	{
												position:absolute;
												font-size:50px;
												width:280px;
												height:120px;
												left:20px;
												}
								-->
						</style>
							</head>
The source text begins with the Web-IO specific tag <user.htm>, which the Web-IO needs for internally associating into the file system. The <user.htm> tag is now passed from the Web-IO to the browser.
Then the normal <head> area of the Web page follows. Important is the speifier "viewport". This limits the normal zoom-out of the Web page to 320 pixels, so that the Web page can always be displayed in full and in the desired scaling.
Further on in the source text DIV elements for description and display are created. Corresponding CSS-Style information is contained in the head for these elements. Among other things, height and left position are defined.
							<body>
							<div class="description" style="top:5px;">Rolladen Steuerung</div>
							<div id="go_up" class="confirm" style="top:30px;"></div>
							<input type="button" class="buttons" onclick="goup();" style="top:50px;" value="AUF">
							<div id="go_dw" class="confirm" style="top:190px;"></div>
							<input type="button" class="buttons" onclick="godown();" style="top:210px;" value="ZU">
						</body>
						</html>
Then follows the <body> area of the Web page. Here the CSS Classes defined in the head, such as the top specifiers, are used to bring the individual DIV elements into position. For the DIV elements that still need to be changed after loading the Web page are assigned an ID. The buttons are assigned using onclick, to indicate which JavaScript function they should invoke.
				<script language="JavaScript" type="text/javascript">
				function DataRequest(sendstring)
					{
					var xmlHttp = window.ActiveXObject ? new ActiveXObject("Microsoft.XMLHTTP") : xmlHttp = new XMLHttpRequest();
					if (xmlHttp)
						{
						xmlHttp.onreadystatechange = function()
							{
							if (xmlHttp.readyState == 4)
								{
								if (xmlHttp.status == 200)
									{
									var ReceiveData = xmlHttp.responseText.split(";");
									if (ReceiveData[1]==’2’)
										{
										document.getElementById(’go_up’).style.backgroundColor=’#99CCFF’;
										}
										if (ReceiveData[1]==’1’)
										{
										document.getElementById(’go_dw’).style.backgroundColor=’#99CCFF’;
										}
										xmlHttp=null;
									}
								}
							}
						xmlHttp.open("GET",sendstring, true);
						xmlHttp.setRequestHeader("Connection","close");
						xmlHttp.setRequestHeader("If-Modified-Since","Thu, 1 Jan 1970 00:00:00 GMT");
						xmlHttp.send(null);
						}
					}
				function godown()
					{
					DataRequest(’outputaccess0?PW=&State=ON&’)
					document.getElementById(’go_dw’).style.backgroundColor=’#CCCCCC’;
					}
				function goup()
					{
					DataRequest(’outputaccess1?PW=&State=ON&’)
					document.getElementById(’go_up’).style.backgroundColor=’#CCCCCC’;
					}
				</script>
The core of the Web page is the JavaScript section, which is contained in the <head> area of the Web page. The functions goup() and select godown() invoke the DataRequest function and send the Web-IO specific command for setting the desired output as a command string. In this method document.getElementById() the DIV element beneath the button is shown in gray to indicate to the user tht his button click was recognized.
The receive function embedded in the DataRequest function turns the DIV element back to light blue after confirmation has been received.
The Web page is now finished and just needs to be uploaded to the Web-IO.

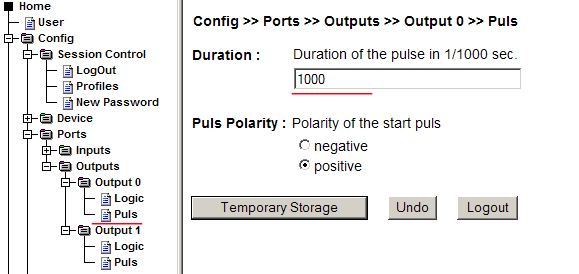
Since the outputs are only supposed to poll the roller shutter with a short pulse, a pulse length of 1000ms should be specified for both outputs.

No problem: We will be glad to send you the Web-IO Digital 2xInput, 2xOutput at no charge for 30 days. Simply fill out a sample ordering form, and we will ship the Web-IO for testing on an open invoice. If you return the unit within 30 days, we will simply mark the invoice as paid.