Tutorial:
WireGuard VPN tunnel between 2 network islands
The goal of this example is that a PC in Island 1 can access the website (http/80) of the Web-IO in Island 2 using the VPN tunnel. No other communication between the two islands should be possible.

Prerequisites:
-
Microwalls and devices in the two islands are pre-configured with the above specified IP parameters.
-
The Web-Based-Management of both Microwalls is accessible in the customer’s intranet.
Note: In the example shown here the Microwall is used to configure the VPN client for the sake of simplicity. Also included is the sensitive private key which authenticates the client. For environments with heightened security requirements the key should therefore be generated on the client itself and only the non-critical public key be passed to the Microwall.
Necessary steps at a glance:
1. Configuration of the VPN server Microwall
-
Start a browser in the customer LAN and use https to open a connection to the Microwall which should work as a VPN server (10.20.0.189).
-
Navigate to "Home", to "VPN-Server" and to "VPN environment".

-
The "Virtual IP" of the VPN server and IP area of the VPN tunnel is for the most part selectable. However no conflict with the IP areas of the associated networks should exist (Island 1, Island 2, intranet).
-
On the indicated UDP listen port the VPN server expects incoming connections from the VPN client.
-
Save the changes and navigate through "Home" and "VPN-Server" to "Client inventory".
Setting up the VPN client
-
To set up a new VPN client first click on the + symbol. For the simplified startup described here in which the client configuration file is generated by the server Microwall, enable the slide switch "Advanced Configuration" 1.

-
Assign the IP address of the VPN client 2 from the area of the VPN tunnel and select a name for the client.
-
Under "IP area Site-to-Site" 3 enter the Net-ID of the remote island network located on the VPN client.
-
Click on "GENERATE KEYS" 4. The Microwall generates a Public/Private key pair for the VPN client. The sensitive private key is used exclusively for generating the configuration file of the VPN client and shown only in this dialog. It is not saved.
-
The pre-settings for "Endpoint (VPN Server)", "Allowed IPs" and "Keep Alive" 5 can be used unchanged in the application example.
-
Use the "Download Config file" button 6 to download the configuration file and save it. Note that this configuration file also contains the confidential private key for the VPN client. Take appropriate measures to protect it from unauthorized access.
-
After downloading the Config file click on "Add" 7 to finish creating the VPN client. To save, click in the following overview of the VPN client on "Save".
Setting up release rules
-
To enable web access from the PC in Island 1 to the web pages of the Web-IO in Island 2 you must set up release rules. To do this, navigate to the "Home" page and "VPN Server" to "VPN Rules". To set up a new release rule first click on the "+" symbol.
-
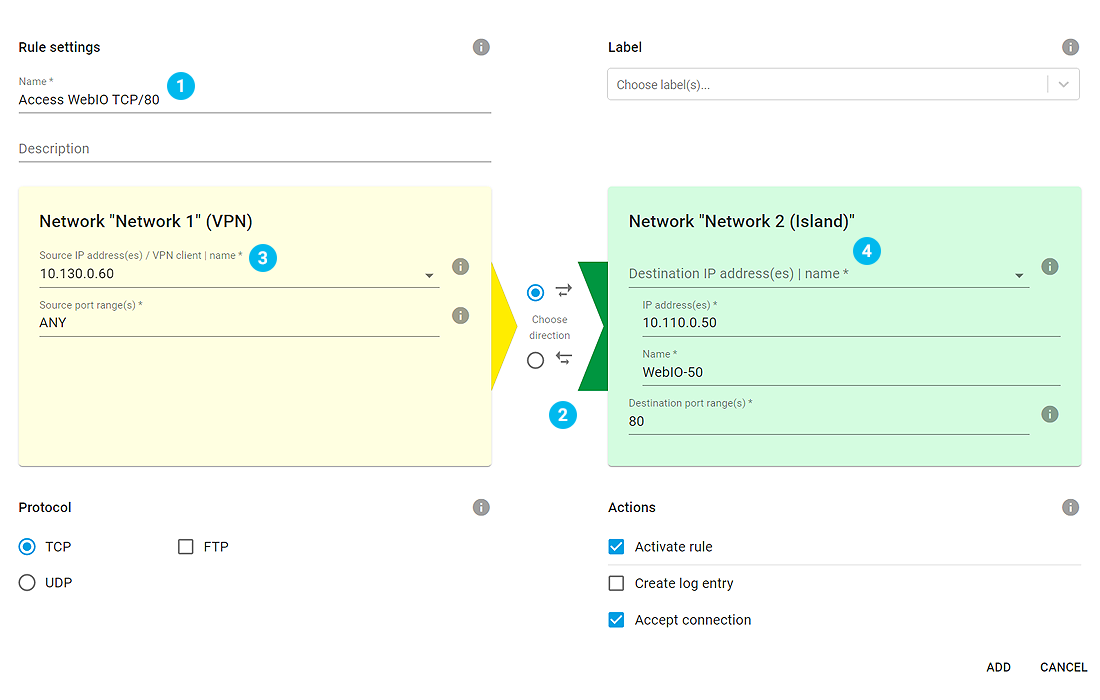
Assign a freely selectable name for the rule 1.
-
Click on the direction arrow 2 to specify that this is an incoming connection to the Web-IO island.
-
Under "Source IP" 3 enter the IP address of the remote PC (10.130.0.60) in Island 1 which should access the Web-IO. As source port select "any", since this is generally determined dynamically on the client side and cannot be specified.
-
Under "Destination IP" 4 entere the IP address of the Web-IO in Island 2 (10.110.0.50). As "Destination port" enter "80" as the default port for the Web-IO web page.
-
All other settings remain as the default settings in this example. To exit the dialog click "Add" and then "Save" in the inventory list.
-
Finally the Microwall must be told in the form of a static route that the network of Island 1 can be reached through the VPN connection. Change to the menu branch "Network" under "Basic settings". To set up a new route, click on the "+" symbol under "Static routes". The route to network Island 1 uses "Net-ID" and "Subnet mask" to pass through the VPN interface 10.10.10.1 ("Gateway") of the Microwall. Use "Add" and then "Save" to exit configuration of the VPN server Microwall.

2. Configuration of the VPN client Microwall
-
From the customer LAN start a browser and use https to open a connection to the Microwall which should function as a VPN client (10.20.0.62).
-
Navigate through "Home" to the "VPN client" page and under "Load configuration" click on "Upload). Select the configuration file previously generated on the VPN server and confirm the upload.
-
Activate the VPN client and then click on "Save". Beneath the "Activate client" option the status of the VPN tunnel should after a brief time change to "open".

-
Finally the VPN client Microwall must be told in the form of a static route that the opposite network of Island 2 can be reached through the VPN connection. In "Basic settings" change to the "Network" menu branch. To set up a new route click on the "+" symbol under "Static routes". The route to network Island 2 uses "Net-ID" and "Subnet mask" to pass through the VPN interface 10.10.10.2 ("Gateway") of the Microwall. Click on "Add" and "Save" to exit configuration of the VPN client Microwall.

3. Testing the VPN connection
-
The web page of the Web-IO 10.110.0.50 in Island 2 can now be reached with a browser on the PC/10.130.0.60. The WireGuard VPN tunnel along with encryption of the data ensures their integrity as well as authentication of the VPN client.
-
The proof of the pudding is in the eating!
We are happy to provide you with a Microwall at no charge for a period of four weeks.
Request test unit -

Thomas Clever
t.clever@wut.de
You can reach our engineers by phone at +49 202/2680-110 (Mon.-Fri. 8 a.m. to 5 p.m.)